CONNEXROOM User Guide
WINDOWS

macOS
Click on your version to show the user manual
Installing CONNEXROOM
First, install the software by running the file 'conneXroom-version.exe’.
CONNEXROOM will require that the user disconnects any headphones or USB microphone/speakers during the installation procedure and will ask the user consent to install an additional PowerShell module that is used to auto-configure the Windows Audio.
Make sure to go through this manual such that CONNEXROOM is properly set up!
If Windows Defender Firewall (security alert) prompts you to allow it access to both Private and Public networks, give it the required permission for both.

Communication
The current version of CONNEXROOM uses peer-to-peer (P2P) communication to exchange data between the devices; for this reason, make sure the devices are connected to the same (W)LAN (preferably cable or WiFi 5GHz but WiFi 2.4GHz works, too), and that they can ping each other with their local IP addresses.
If your network has port isolation enabled, test CONNEXROOM under a different local network where P2P communication through local IP addresses is a possibility.
First setup
The following 3 steps describe how to set up CONNEXROOM (only once) after installation.
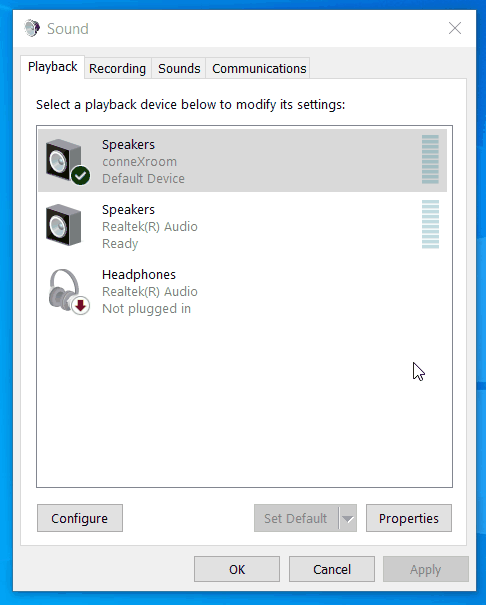
First, make sure that in the Windows Sound Control Panel:
-
The internal Speakers/Microphone of your laptop (Realtek® Audio in the example) are selected as “Default Device” (if not, right click on the device and select “Set as Default Device”). Both devices should have the option “Audio Enhancement” ON.
-
The CONNEXROOM Speakers/Microphone are selected as “Default Communication Device” (if not, right click on the device and select “Set as Default Communication Device”)
Second, you need to set up CONNEXROOM. Launch CONNEXROOM On the first run, it should prompt the Preferences.
-
Go to the LICENSE tab. Add the License Key provided by CONNEXOUNDS and your username; the latter will be visualized by the other users of CONNEXROOM.
NOTE: all users within the same room must use the same license!!!
-
Go to the AUDIO tab, make sure that the internal Speakers/Microphone of your laptop (Realtek® Audio in the example) are selected. Audio Device type should preferably be “Windows Audio” but “Windows Audio (Low Latency Mode)” works too. Sample rate should be “48000”, and Audio Buffer Size should be “480 samples” (these should be automatically selected, but sometimes things might change).
It’s always better changing the AUDIO options when you are not connected! CONNEXROOM will check if the AUDIO settings are correct. If so, you don’t have to change them.
-
Go to the NETWORK tab and set the Default Network Speed. This is preset to “Medium”. However, it is recommended to use "Fast" if you're using a wired connection or a fast WiFi (e.g. a low-congestion 5GHz network); otherwise, you should stick to "Medium" or "Slow" (especially on crowded and non-stable WiFi networks). Additionally, CONNEXROOM requires to use some communication ports: one port both UDP and TCP for the server communication (this might depend on your version, is between 10990-10999, and will be shown in the “Server Comm.” box); 11000 UDP port (default 11000 but this can be changed) for local communication.


Third, make sure that the Speakers/Microphone (CONNEXROOM) are selected as Speakers/Microphone of your favorite communication App:


What to do before and after the call
Before the call: connecting to the virtual room
Before joining a call in your favorite communication app, press the "Connect to Room" on the top right of the GUI. The button shows the name of the virtual room tied with your license, e.g. “Meeting_Room_01” in the example.
Once you are connected, the Connect to Room changes into Disconnect from Room and, on the top of the central panel, you will see some information about the virtual room name, your username, and the amount of users connected to the virtual room.
Additionally, in the central panel, you can now see the usernames of the other users of your local CONNEXROOM virtual room (if every user has already entered the same credentials associated to the virtual room).
You can join the actual meeting with your favorite communication app.
Happy hybrid meeting!
After the call: disconnecting from the virtual room
After finishing the call in your favorite communication app, you should disconnect through the "Disconnect friom Room" button on the top right of the GUI. You may also want to quit the app.


Installing CONNEXROOM
First, install the software by running the file 'conneXroom-version.pkg’ with admin rights.
CONNEXROOM will require that the user disconnects any headphones or USB microphone/speakers during the installation procedure.
After the installation, CONNEXROOM will be automatically launched. Make sure to go through this manual such that CONNEXROOM is properly set up!
The first time CONNEXROOM is booted up give the app permission to access the microphone (click "OK") and to accept incoming network connections (click "Allow").


Communication
The current version of CONNEXROOM uses peer-to-peer (P2P) communication to exchange data between the devices; for this reason, make sure the devices are connected to the same (W)LAN (preferably cable or WiFi 5GHz but WiFi 2.4GHz works, too), and that they can ping each other with their local IP addresses.
If your network has port isolation enabled, test CONNEXROOM under a different local network where P2P communication through local IP addresses is a possibility.
First setup
The following 3 steps describe how to set up CONNEXROOM (only once) after installation.
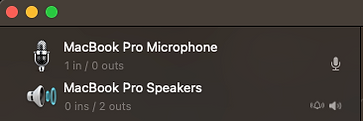
First, go to “Applications > Utilities > Audio MIDI Setup” and make sure that:
-
The internal Microphone of your laptop (referred to as “MacBook Pro/Air Microphone” or “Built-in Microphone”) is used as “Sound Input Device”, i.e. the audio device should have a little microphone icon on the bottom right (see image). If not, right click on the device and select “Use This Device For Sound Input”).
-
The internal Speakers of your laptop (referred to as “MacBook Pro/Air Speakers” or “Built-in Speakers”) are used as “Sound Output Device”, i.e. the audio device should have a little speakers icon on the bottom right (see image). If not, right click on the device and select “Use This Device For Sound Output”.
Second, you need to set up CONNEXROOM. Launch CONNEXROOM (find the icon in your menu bar, close to where your Mac prompts the WiFi, battery status, and the time). On the first run, it should prompt the Preferences.
-
Go to the LICENSE tab. Add the License Key provided by CONNEXOUNDS and your username; the latter will be visualized by the other users of CONNEXROOM.
NOTE: all users within the same virtual room must use the same license!!!
-
Go to the AUDIO tab, make sure that the internal Speakers/Microphone of your laptop are selected. Sample rate should be “48000”, and Audio Buffer Size should be “256 samples” (these should be automatically selected, but sometimes things might change).
It’s always better changing the AUDIO options when you are not connected!
-
Go to the NETWORK tab and set the Default Network Speed. This is preset to “Medium”. However, it is recommended to use "Fast" if you're using a wired connection or a fast WiFi (e.g. a low-congestion 5GHz network); otherwise, you should stick to "Medium" or "Slow" (especially on crowded and non-stable WiFi networks). Additionally, CONNEXROOM requires to use some communication ports: 10995 both UDP and TCP for the server communication; 11000 UDP port (default 11000 but this can be changed) for local communication.


Third, make sure that the CONNEXROOM Speakers/Microphone are selected as Speakers/Microphone of your favorite communication App:


What to do before and after the call
Before the call: connecting to the virtual room
Before joining a call in your favorite communication app, press the "Connect to Room" on the top right of the GUI. The button shows the name of the virtual room tied with your license, e.g. “Meeting_Room_01” in the example.
Once you are connected, the Connect to Room changes into Disconnect from Room and, on the top of the central panel, you will see some information about the virtual room name, your username, and the amount of users connected to the virtual room.
Additionally, in the central panel, you can now see the usernames of the other users of your local CONNEXROOM virtual room (if every user has already entered the same credentials associated to the virtual room).
You can join the actual meeting with your favorite communication app.
Happy hybrid meeting!
After the call: disconnecting from the virtual room
After finishing the call in your favorite communication app, you should disconnect through the "Disconnect friom Room" button on the top right of the GUI. You may also want to quit the app.
